have we met before?
login or create an account
login or create an account

As you may have learned from the article titled special effects waxes, there are specialty waxes that give your candles a special appearance, like for example a marbled effect.
Of course, these kinds of specialty waxes are quite expensive and can be hard to find if you're not in the United States... But I will now show you a simple and original technique you can use to make candles with a fantastic marbled look without specialty waxes or any additive other than the good old stearic acid.
Focus on this nice and little known technique...
As always, make sure that your work area is clean and you have enough place to work comfortably and safely. Gather all the supplies you will need for this project.
In the double boiler, start melting the two batches of the paraffin / stearin mix. Keep in mind that you will have to pour both of them at the same time. You need twice as much white wax than colored wax.
For a better effect, add some white candle dye to the batch of white wax: uncolored paraffin tends to have a "dirty white" look that the use of a little white dye will prevent.
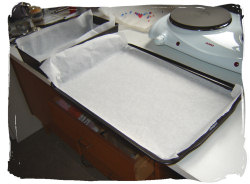
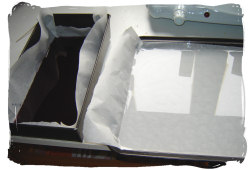
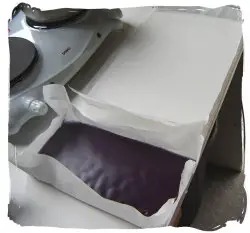
While the wax is melting, prepare your two oven trays: cover them entirely, edges included, with waxed paper. You will need the trays later on to create two wax sheets.
In the largest tray, you will cut two white wax sheets of the same size (about 30cm x 10cm). In the small tray, you will cut out a colored wax sheet of the exact same size.
When both batches of wax are ready to pour, remove the melting pots from the double boiler and wipe their surface with kitchen paper or an old kitchen towel; this will prevent water from mixing with the wax when you pour it in the trays.
Make sure both trays are perfectly level so that your wax sheets have a regular thickness, then pour the wax: the white wax into the large tray, the colored wax into the small tray. The goal is to end up with wax sheets with an average thickness of 7 or 8 mm.
Let the wax set and wait until it has cooled sufficiently. This will take an average of ten minutes, although it can vary in function of the thickness of the wax sheets you make and the room temperature.
To check if the wax is ready to be used, gently press your finger in a corner of the wax sheet: if you don't feel any resistance and your finger leaves a distinct mark in the wax, it means it's too early and you will have to wait a little bit longer.

Once the wax has reached the right consistency, gently remove waxed paper and wax sheet from the trays and put the trays out of the way, you won't be needing them anymore.
From now on and until the very end of this project, you will have to work quickly: the wax won't remain soft and kneadable for a long time.
If it looses its softness while you're still busy, reheat it by exposing it to the hot blow of a hair dryer.
Using a round tip knife (to avoid damaging the waxed paper sheet underneath), cut out two rectangles of about 30 x 10cm in size from the white wax sheet. Then cut out one single rectangle of the same size from the colored wax sheet.

Make a sort of lasagna by putting the colored wax rectangle on top of one of the white ones. The second white sheet comes above the colored one.
Put this new, two-colors wax sheet on the large piece of waxed paper you used to create the white wax sheets.
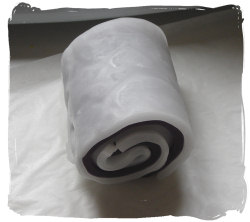
Roll up your "lasagna" to give it a cylindrical shape and put it in the middle of one half of the waxed paper sheet.

Fold the other half of the waxed paper sheet on top of the other to create a kind of "bag" where the wax cylinder will be kept captive.
Now, knead the wax energetically with your hands (like you would with bread dough) and turn it into a ball. The goal here is to mix both colors as thoroughly as possible. Now and again, open the "bag" to check if there's no prevalence of one color in some places. If that's the case, use your finger to push that color towards the inside of the wax ball and keep on kneading.
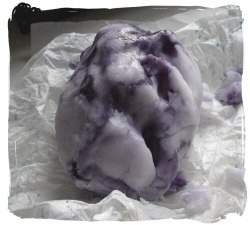
When your wax ball looks like what you see on picture 8, stop kneading and place it on a new sheet of waxed paper. Cover it with yet another sheet of the same paper (I warned you you were going to need a lot of waxed paper; you can also reuse the bags that hold corn-flakes, it works just as good).
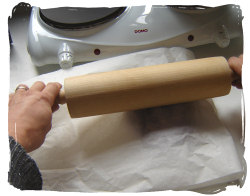
Using the rolling pin, flatten the wax ball (rotate it often to ensure a uniform result). Continue until the wax ball has turned into a wax sheet about 2,5 centimeters thick.
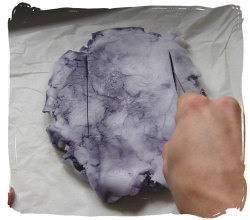
Remove the top waxed paper sheet and, using the metal ruler and the knife, cut out a square of approximately 8 x 8 centimeters. Try and cut perfectly vertical: you want your candle to have straight sides.
When I shooted this project, I didn't use a ruler. I should have: my square is slightly trapezoid and its sides aren't exactly straight :-(
You could also use cookie cutters instead of a knife if you want candles of a specific shape. With a cookie cutter of the right shape and size, you could create marbled tealight candles.
While the wax is still soft, use the wicking needle (or a kebab stick) to drill a hole through the center of your wax square.
This will allow you, when the wax has completely cooled off, to install the wick.
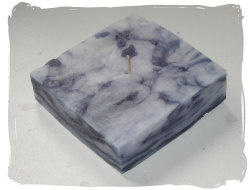
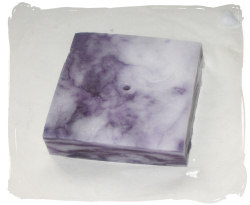
When the wax has entirely solidified (after about 2 to 3 hours), flip the square to see which side you like most.
Then, thread a primed, tabbed wick through the hole you made in the previous step. Make sure you display the side of the candle you prefer.
So that's it, your marbled candle is finished! I don't know what you think about it but I sure think it mimics the noble look of marble better than any specialty wax that generally costs at least 5 times more than the basic paraffin / stearin mixture we've just used!
 Thanks a bunch!