have we met before?
login or create an account
login or create an account

It's always the same!
As soon as the word starts circulating that you're into candlemaking, it doesn't take long before everyone you know (and all their acquaintances) turn up with bags full of pieces and bits of old, burned up candles, usually all different in color and type of wax!
It seems that everyone believes that candles can only be made from other candles...
But because it's thoroughly well-meant and that it would be a shame to throw away all these candle bits (hello pollution!), this article will try and explain the best way to recycle - and reuse - as much as possible of these small leftovers...
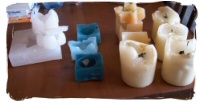
Start by sorting all the wax bits by color and by type of wax. This is an essential step because mixing different colors will give you a dirty brown colored wax that can't be used for anything!
Of course, mixing a container wax blend with a pillar wax blend is a very bad idea because the two have a very different formulation.
So put the pillars on one side, the containers on another side (it is unlikely that you'll ever receive bits of taper or votive candles but if you do, it's better to use these individually, for example to turn them into "chunks").
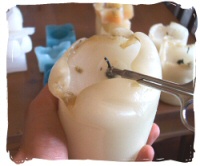
You will probably receive the candles in the same state as they were blown out for the last time. This means pieces of burnt wick on and under the surface of the wax and very likely a nice amount of soot...
Your first task, when the sorting is done, will be to remove as much as possible of this black waste that can easily make the wax unusable. Using the nail scissors, cut the wick as short as you can. Ideally, try and cut it under the surface of the hardened wax to be sure you entirely remove the burnt part of the wick.
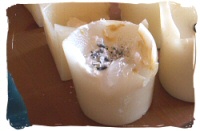
Using an old kitchen knife or any other tool, scrape and remove as much soot as you can from the surface of the candle.
The less dirt on the wax when you start melting in in your double-boiler, the easier it will be and you should be able to skip the unpleasant filtering step (see below).
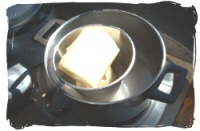
The time has come to turn on your double-boiler.
Choose a clean melting jug large enough to hold all the candle bits you want to process. In the jug, pour an half-inch of water: this will allow any dirt to sink to the bottom of the jug and not be in contact with the wax anymore.
Put the candle bits in the melting jug (after one last check that they're as clean as you can get them) and place the jug in your double-boiler.
Let the wax melt completely.
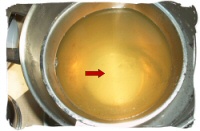
When the wax is totally liquefied, have a look at the bottom of the jug.
That's where all the things that must be removed will be (burnt and unburnt wicks, soot, you name it).
Using your wicking needle, try and fish out the largest pieces of wick and throw them away, no recycling possible here.
If you notice that there's a lot of dirt at the bottom of the jug, it is recommended that you filter the wax out (see below). If you feel this is not necessary, put your wax thermometer in the melting jug and bring the wax to a temperature of 194°F.
If no filtration is needed, you can proceed to the pouring step.
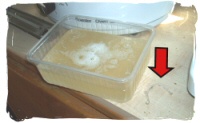
Check that the tray where you will pour the wax is clean and dry.
Remove the melting jug from the double-boiler and wipe off its surface with a rag or a paper towel: you really need to avoid that water would end up in the wax.
Slowly (to avoid air bubbles), pour the wax into the tray, making sure that any dirt remains at the bottom of the melting jug (the water you've added in step 4 will make this easier).
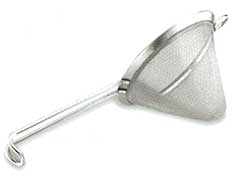
If you feel the wax needs to be filtered out first, let the wax reach a temperature between 374°F and 401°F. If you pour colder, the wax will be too thick and won't go through the mesh of the strainer.
To avoid that the wax would congeal when it touches the strainer, try and warm the latter up using a heatgun.
When the wax has reached the correct temperature and the strainer is ready, follow the instructions in step 6 and pour the wax in the tray, through the strainer. Make sure the water at the bottom of the melting jug does not end up in the wax. If you know from the start filtration will be necessary, you do not need to add water in the melting jug.
Pour very slowly and, if necessary, help the wax go through the strainer with a gentle blow of the heatgun (watch out: the strong blow of a heatgun can easily throw hot wax all around).
If all went well, the wax you just poured should be clean of any dirt.
If that's not the case, don't panic: any dirt will slowly sink to the bottom of the tray and, once the wax has cooled off and turned solid, all you'll have to do is scrape the bottom of the wax block to remove the dirty layer.
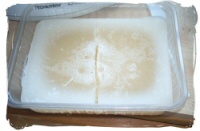
Let the wax cool off completely before you unmold it: it should feel cool to the touch.
On picture 8, you can notice that the middle of the wax block is still warm: the color there is darker than on the sides.
If you want to divide the wax block in smaller pieces, easier to handle and to store, you can cut the wax block in the tray, while the wax is still lukewarm, using an old kitchen knife.
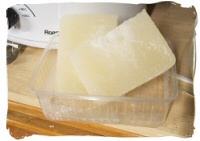
When the wax block has cooled off completely, unmold it.
If you cut it out in smaller pieces during the previous step, dividing the large block in smaller ones should be no problem.
You are now the proud owner of good quality wax blocks, ready to be turned into candles again!
Don't forget to store them carefully in freezer bags until you use them. Always label the bags so that, after several months, you'll still know where the wax comes from and of what type it is. This way, you won't make a pillar with container wax or vice versa!
 Thanks a bunch!