have we met before?
login or create an account
login or create an account

There's one thing about candlemaking: it's a great hobby but it's clearly oriented towards grownups. Melting wax can be a potentially dangerous process and children should not be allowed to do that on their own.
Fortunately, there are exceptions to this rule and this project is one of them!
What makes it so appealing is that it allows for an active collaboration from your little ones: you take care of the preliminary phase (the melting and pouring process), then it's their turn to play and let their creativity do the talking... in all safety.
So put on your aprons and let's get started!
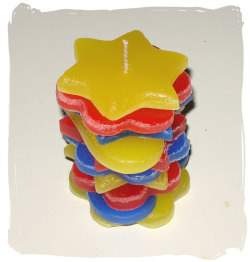
These pretty candles have one drawback: they tend to lack any form of stability!
I would recommend you treat them as purely decorative items and refrain from burning them. But if you (or your children) really can't resist the temptation, always place the candle in a heat-resistant glass container first.
Don't forget that, under any circumstances, you should never leave a burning candle unattended and always keep candles out of reach of children and pets.
Using the same principles explained in this project, you can create candles with a much better stability: make thicker wax sheets (1 cm or more), cut out larger discs (circle or square shapes only) and reduce the number of those discs. You can also use a little glue wax to secure the discs together.
and of course the usual supplies: double boiler, melting pots...

For this project, you will need a lot of free space on and around your work area: enough room for the oven tray and to lay multiple sheets of waxed paper next to that tray (you will need the waxed paper to hold the freshly cut wax shapes; they will remain there until they're hard).
You will probably want to use multiple colors (I used three in this example). So ideally, to avoid wasting time, you should be able to melt two batches of paraffin simultaneously. If you work in your kitchen and have two double boilers (or one large enough to hold two melting pots), it will allow you to prepare the next color while you're cutting shapes out of the first one.
If you have only one melting pot, no big deal, the preparation phase will only last a little longer.
To start, place about 500 grams of paraffin plus 10% of stearic acid in your melting pot, put it in the double boiler and let the wax melt. If possible, don't wait and also prepare the second batch of paraffin in second melting pot.

Don't forget to constantly monitor the temperature of the wax with a thermometer (if you use more than one melting pot, you will of course need either more than one thermometer or an infrared one). When the temperature reaches 185°F, it's the perfect moment to add color; add dye to the wax and stir thoroughly with a wooden stick (use a different stick for each color to avoid an accidental color mix).
Now, cover the tray entirely (including the edges) with a large sheet of waxed paper. Check one last time that the temperature of the wax is still in the pouring range. If that's the case, remove the melting pot from the double boiler and, before you pour, wipe the outside of the pot with an old kitchen towel to prevent water from mixing with the wax. Pour slowly in the tray covered with waxed paper.

There's nothing better than cookie cutters to cut regular shapes out of your wax sheet when it has cooled off enough. These simple little instruments (usually metallic) are commonly used for pastry making and are easy to find almost everywhere (check cookiecutter.com for unusual and original shapes).
Whenever possible, choose shapes with a diameter that's more or less constant, like a circle, a square, a star... avoid irregular shapes like half moons, Christmas trees, music notes, etc. Such shapes make it hard to choose a wick that will perform well (if you ever choose to burn your candle, more on that later).

Cutting out nice, sharp shapes is an easy process but success or failure will depend on the consistency of the wax sheet: it must havehardened enough... but not too much.
Choosing the right time is a matter of experience because it depends on the thickness of the wax sheet, on the room temperature and on other factors. The following tips will help you decide if it's time to cut or not:
Push the cookie cutter all the way through the wax sheet. If you see any liquid wax coming to the surface, it's a sign that the wax hasn't cooled off enough yet. Wait 5 minutes and try again.
If the cookie cutter leaves a clean cut in the wax, it's perfect, you can now really start creating your wax shapes. Work fast: the wax won't remain soft very long. You will notice that as the wax sheet gets harder, the wax shapes will tend to remain inside the cookie cutter when you remove it.
If that's the case, you'll just need to gently push it out and lay it flat on one of the sheets of waxed paper you have prepared to that effect. Leave the shapes there until they have cooled off completely.
If it's not the case, no problem; you will separate the shapes from the hard wax sheet when you're done cutting them out.

In both cases anyway, don't wait and immediately create a hole for the wick. For that purpose, you can use a thin plastic straw, like those you find attached to juice boxes.
For optimal final results, make sure you drill the hole in the very center of the shape. Rotate the straw a few times left and right; the small portion of wax should remain inside the straw when you remove it. Just blow in the other side of the straw to get it out.
Don't throw those small colored bits of wax away. Keep them in small containers and when you have saved a sufficient amount; let your children make a "cold candle" by placing these tiny bits of wax artistically in a glass container (before they start, set up a tabbed wick in the container).
(This is called a cold candle because no wax melting is required to make them. A cold candle can burn just like a regular Container candle)

When all the shapes have been cut out, the wax sheet is usually hard enough to be separated easily from its freezer paper support.
It is now child's play to free the shapes that still stick to the wax sheet (just press gently and they will come out). Place them on a freezer paper sheet and let them cool off completely.

Repeat these steps for every color you want to use.


By now, you should have a nice collection of wax discs of different shapes and colors, each one with a little hole in the middle.
If your children are old enough, maybe they helped you with the "cookie-cutting" process. Whether this is the case or not, their time has come now to showcase their creativity.
Prime and tab one (or several) wick (choose the wick size in function of the average diameter of the wax shapes) and let the kids freely pile up the wax shapes of their choice around it (be sure to read the safety precautions below).
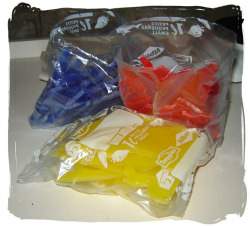
As always, all the leftovers (whatever remains of the wax sheets and excedental wax shapes) can and should be recycled and reused in a future project (for ideas and techniques, see the article "How to recycle your wax leftovers").
Break the remains of the wax sheets into small pieces and store them in freezer bags. You can use (among other things) small pieces of colored wax as a dye in candlemaking projects that call for a very pale color.
These pretty candles have one drawback: they tend to lack any form of stability!
I would recommend you treat them as purely decorative items and refrain from burning them. But if you (or your children) really can't resist the temptation, always place the candle in a heat-resistant glass container first.
Don't forget that, under any circumstances, you should never leave a burning candle unattended and always keep candles out of reach of children and pets.
Using the same principles explained in this project, you can create candles with a much better stability: make thicker wax sheets (1 cm or more), cut out larger discs (circle or square shapes only) and reduce the number of those discs. You can also use a little glue wax to secure the discs together.
 Thanks a bunch!