have we met before?
login or create an account
login or create an account

Now that we've seen how to make a pillar candle, why not add some color to it?
In this project, we're making a pillar candle made of several layers of wax with different colors.
The only difficulty here is to know when it's time to pour the next layer: not too soon or the colors will mix but not too late or the layers may not stick together and eventually separate. It's really a question of timing!
and of course the usual supplies, like a double boiler...
As always, make sure you have enough room on your work area to work comfortably.
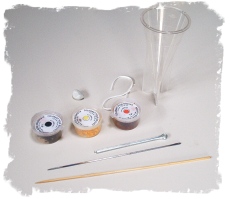
Prepare all the tools and supplies you will need for this project so that everything is readily available when you need it.
In this picture, clockwise and starting at the top, you can see: a small ball of mold sealer, a wick 2 inches longer than the mold, a cone-shaped polycarbonate mold, candle dye in 3 different colors, a wick holder, one of the 3 bamboo skewers I'll use to mix the dye and the paraffin.
For this article, I assume that you will be using 3 different colors. If you use less or more colors, you will of course need to adjust the number of melting pots, skewers,...
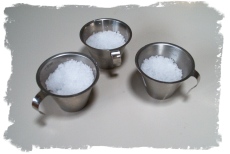
Divide the pillar wax blend into 3 parts and put the wax in the 3 small melting pots but don't fill them up to the brim: they may not lie perfectly horizontal in the double-boiler and you need some room to add and mix the candle dye without spilling any wax when the time has come.

Place the 3 melting pots inside the double-boiler. Because they are the same size and hold the same amount of wax, you need to check the temperature of the wax in one of them only. Their small size make using a candy thermometer more than tricky; try and use a digital probe thermometer instead.
Make sure that the water in the double-boiler does not boil too hard or some water could boil over in the melting pots and ruin your wax.
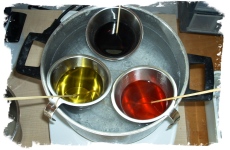
When the temperature of the wax reaches between 176°F and 194°F, it's time to add the candle dye.
Take it easy, it's much easier to add some dye than remove it. Each melting pot should have its own bamboo skewer to mix dye and paraffin: even a tiny amount of a different dye on a skewer can radically change the color of a batch of wax.
Once the dye is thoroughly combined with the paraffin, lower the setting of your double-boiler: you need to let the temperature of the wax drop to 158°F and keep it there as good as you can.
Now, prepare the mold.
As always, it's a good idea to prime the wick you are about to use.
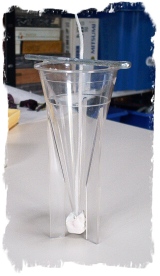
Thread the wick through the wick hole of the mold and allow it to protrude about 2cm on each side. This will make it easier for you to seal the wick hole with some mold sealer on one side and trap the wick using a wick holder on the other side.
At the bottom of the mold (what will become the top of the candle), push the wick against the mold and apply a generous amount of mold sealer. Use enough putty: to straighten the wick with the wick holder, you will have to pull slightly on the wick and it is the mold sealer that will help the wick resist the pulling on this side.
At the open side of the mold (the future base of the candle), straighten and center the wick and install the wick holder to keep it from moving.
Your mold is now ready to receive the first layer of wax.
Using your thermometer, check that the temperature of the wax in the melting pots ranges between 158°F and 167°F.
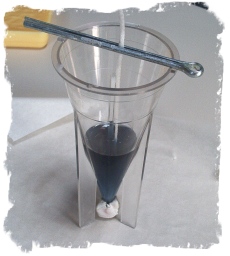
If that's the case, remove the pot containing the desired color from the double-boiler. Pay attention that the water that will drip from the pot when you lift it up doesn't end up in the wax of one of the other jugs below ! Use an old rag to wipe the outside of the pot or some water will inevitably mix with the wax when you it into the mold.
Pour the colored wax in the mold to create the first layer (I made three layers of the same height but you're free to do whatever you want). Just make sure you don't pour against the inner walls of the mold: such a spill would be clearly visible in the next layers.

The secret to successfully make a layered candle with different colors is the amount of time you wait between two layers. If you pour the next layer too soon, the two colors will mix. But if you wait too long, the layers may not stick together and could separate when you manipulate the finished candle.
As you build experience, you will just know when the time has come to pour the next layer. Until then, there's one trick that will help you: thrust your wicking needle along the wick into the top most layer of wax. If the wax is too hard to let the needle through, it's too late. If the needle comes out covered in wax, it's too soon. If it comes out clean, now is the right time to pour the next layer.
These holes you poke in the wax actually have 3 functions and are very important: they let you know when it's time to pour the next layer; they prevent the formation of air pockets inside the wax; and they create "tunnels" that will help two layers of wax stick together (just like an anchor).
Check that the temperature of the wax is still somewhere between 158°F and 167°F.
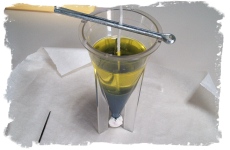
If that's the case, slowly pour the second layer. Here again, try not to pour wax on the inner walls of the mold.

Repeat the same steps you took with the first layer: poke some release holes along the wick as explained above.

If the temperature of the wax for the last layer is correct and the previous layer has cooled sufficiently (but not too much), pour the last layer of colored wax.
You will probably have to fill the sink hole that will form as the last layer cools off. When the sink hole is filled and the candle has entirely cooled, remove mold sealer and wick holder and unmold your candle.
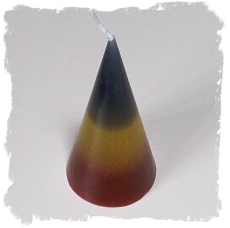
The last thing to do is trim the wick at the base of the candle and, if necessary, level the base on a hot plate.
You've just made a candle with multiple layers of colored wax.
Feel free to try and create more layers and/or more colors. You can also tilt the mold between each layer to obtain oblique, uneven stripes instead of plain horizontal ones.
 Thanks a bunch!